Azure Virtual Network
A virtual private cloud (VPC) is a virtual network dedicated to your AWS account. It is logically isolated from other virtual networks in the AWS Cloud. You can launch your AWS resources, such as Amazon EC2 instances, into your VPC. You can specify an IP address range for the VPC, add subnets, and configure route tables, network gateways, and security settings.
Securing your applications in a VPC is important to ensure that only authorized users and resources can access them. There are several ways to secure your applications in a VPC:
- Use security groups: Security groups act as a virtual firewall for your instance to control inbound and outbound traffic.
- Use network access control lists (ACLs): ACLs are an optional layer of security that acts as a firewall for controlling traffic in and out of one or more subnets.
- Use a bastion host: A bastion host is a secure host that you can use to remotely access your VPC. This is useful for remotely managing instances and other resources in your VPC.
- Use a virtual private network (VPN): A VPN allows you to securely connect to your VPC over the Internet. This is useful for securely accessing resources in your VPC from a remote location.
- Use AWS Identity and Access Management (IAM): IAM allows you to control who can access your AWS resources and what actions they can perform on those resources.
By using these security measures, you can ensure that your applications are secure in your VPC.
Why Virtual Networks?
Virtual Networks act as a communication channel between resources launched in the cloud. Why Virtual? Because there are no actual routers or switches in the cloud. For example, if you launch a database server and a website server in the cloud, they would need a medium to interact. This medium of interaction is called a Virtual Network.
With Virtual Network:
What is an Azure Virtual Network?
Azure Virtual Network (VNet) is a representation of your own network in the cloud. It is a logical isolation of the Azure cloud dedicated to your subscription.

You saw some heavy words in the definition such as, “logical isolation” and “representation of your own network”. Forget the definition for a minute, and just remember this:
If two computers have to interact with each other, they need to have permission. You can add/remove these permissions in the virtual network settings. Once these permissions are added, just include these computers in this virtual network, and voila! You are set. These three lines are the summary of what we’ll be accomplishing today.
Moving on, an Azure Virtual Network is further divided into components.
Virtual Network Components
The following are the virtual network components:
- Subnets
- Network Security Groups
What are Subnets?

Each Virtual Network can be divided into sub-parts, these sub-parts are called subnets.
A subnet can further be divided into:
- Private Subnet – A network in which there is no internet access.
- Public Subnet – A network in which there is internet access.
Let’s look at an example and understand how Virtual Networks are actually used:
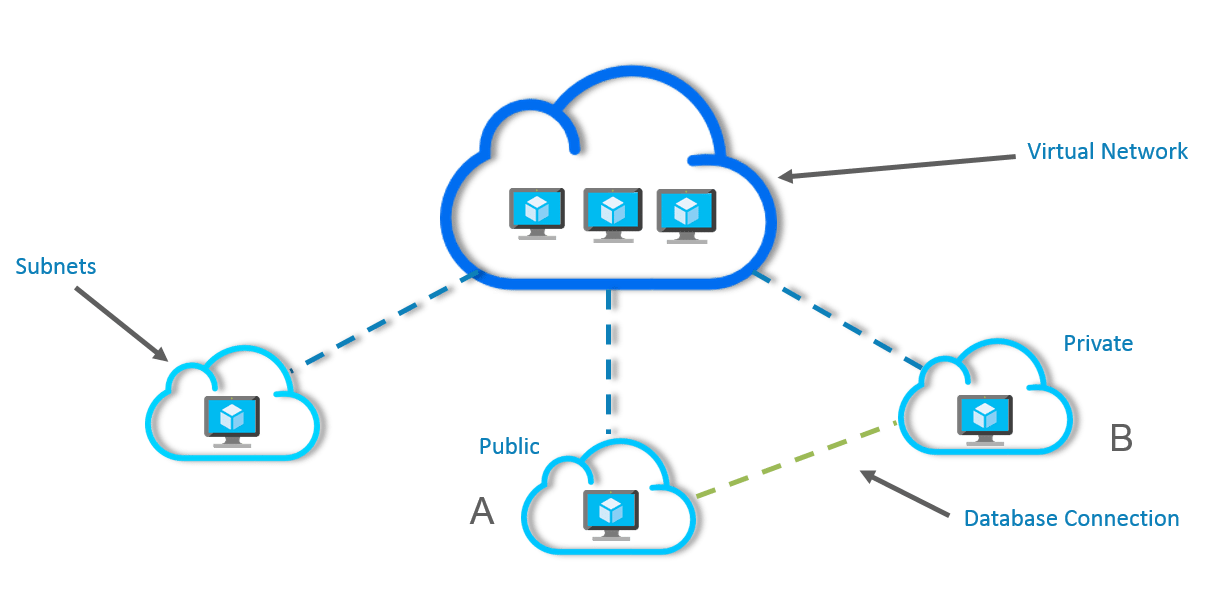
In the above image, a single virtual network has been divided into subnets and each subnet contains a server.
- Subnet A is a web server and hence it is a public subnet because your website will be accessible over the internet.
- Subnet B is a database server and since a database should just be able to connect to the web server, there is no need for an internet connection, hence it is a private subnet.
Network Security Groups
This is where you do all your connection settings, like which ports to open, by default all are closed. Don’t get scared, this blog will guide you through all the settings, and all of them are very easy to configure.
But first, let me show you what the final architecture for a Virtual Network looks like:
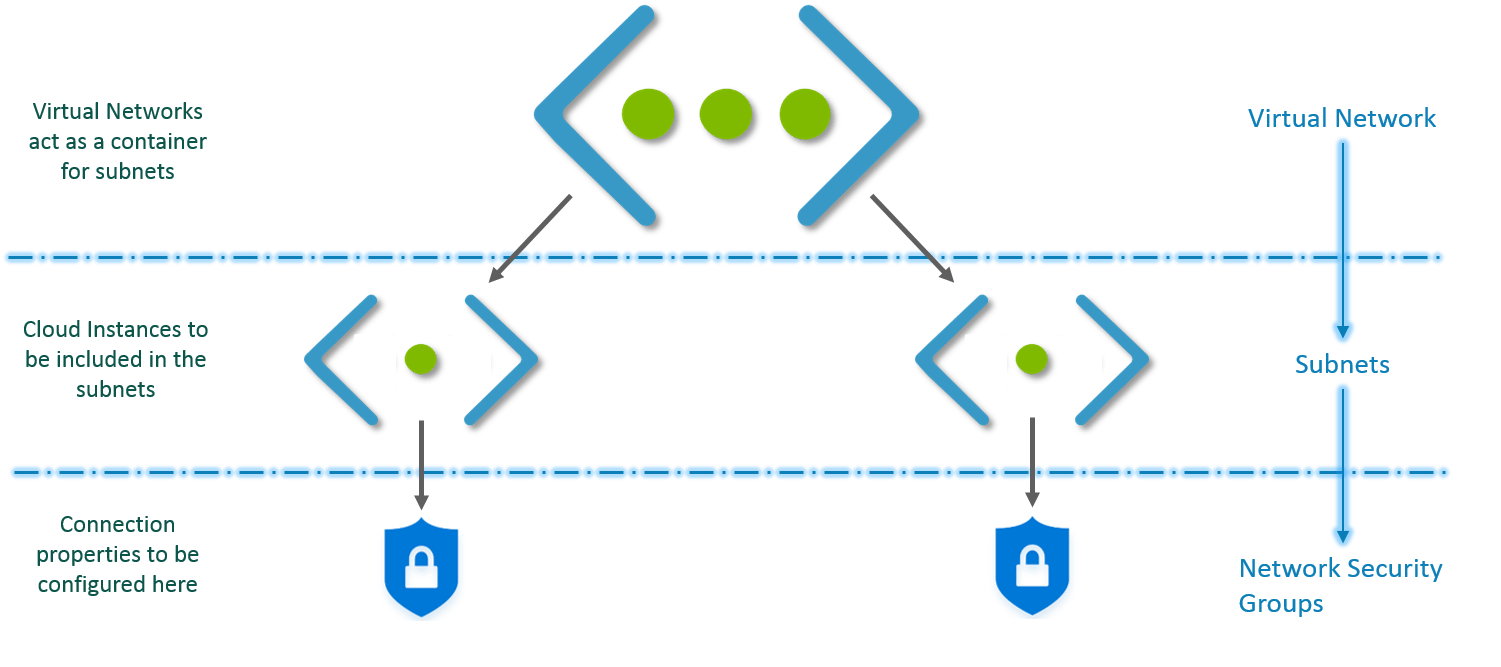
This is how Virtual Network works:
- First, you create a virtual network.
- Then, in this virtual network, you create subnets.
- You associate each subnet with the respective Virtual Machines or Cloud Instances.
- Attach the relevant Network Security Group to each subnet.
- Configure the properties in the NSGs and you are set!
Let’s try this with a demo now.
Demo
We will deploy two servers inside a Virtual Network, a database, and a website server which shall be interacting with each other. Let’s see how we can architect this network.
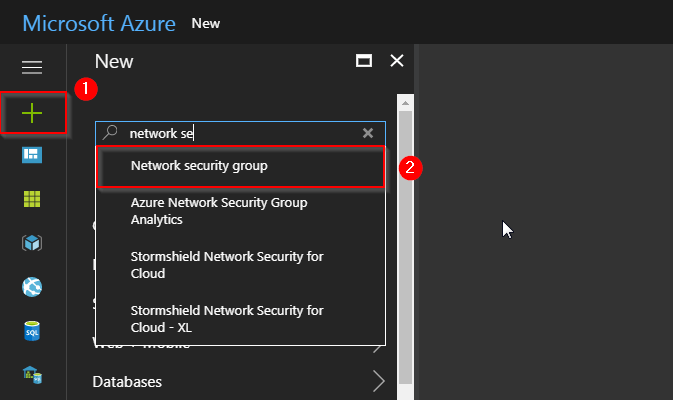
Step 1: First, we will create a network security group. Go to your Azure dashboard, and follow the steps in the image below.
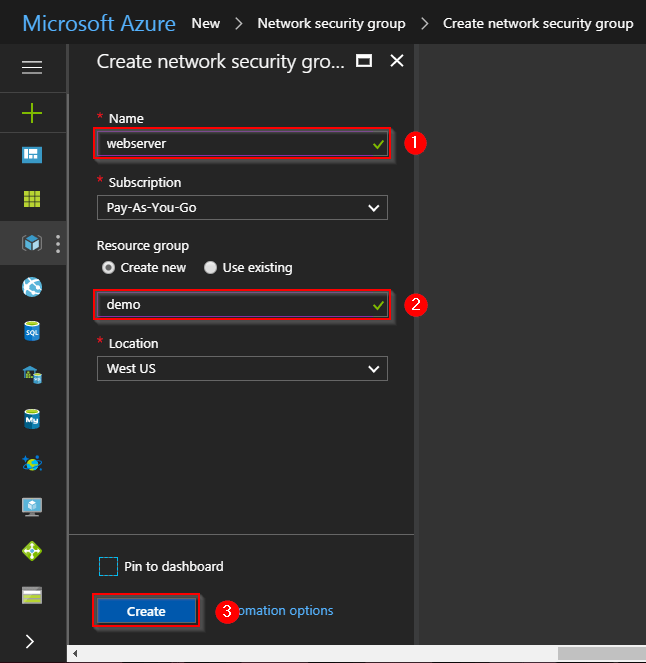
Step 2: Next, you will reach this screen, wherein you will be filling in all the details inside your NSG, and finally click on “Create”. Notice in the image in the second step, you are creating a resource group. Try putting all your resources inside the same group so that it becomes easier to manage.
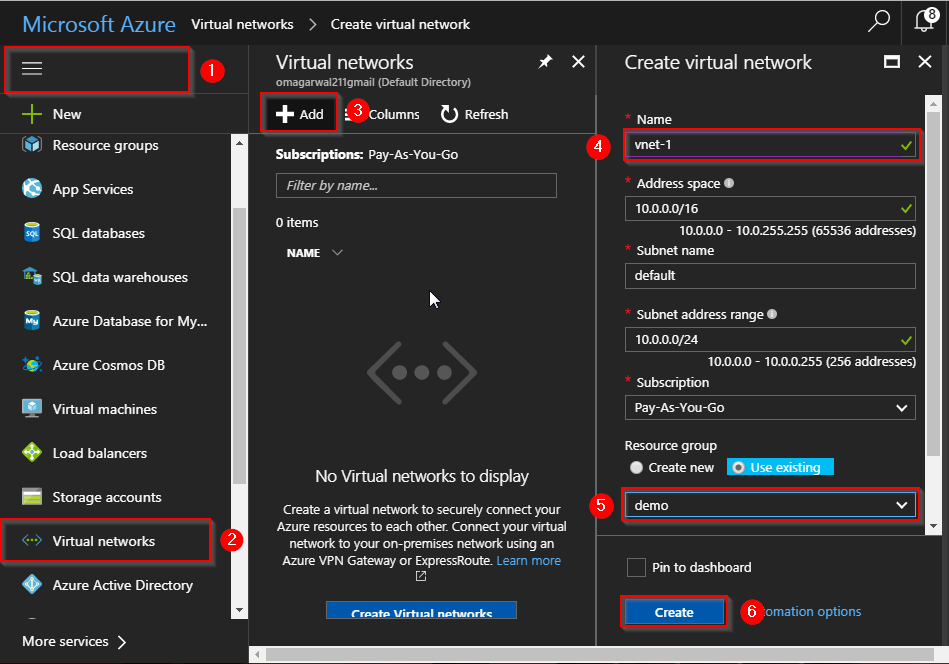
Step 3: We will now create a Virtual Network, follow the instructions in the below image to create one. Remember, in the resource group select “use existing”, and then select the same resource group that you created earlier.
Step 4: Next, we will be creating 2 subnets, one for our website and one for our database. Follow the steps in the images below:
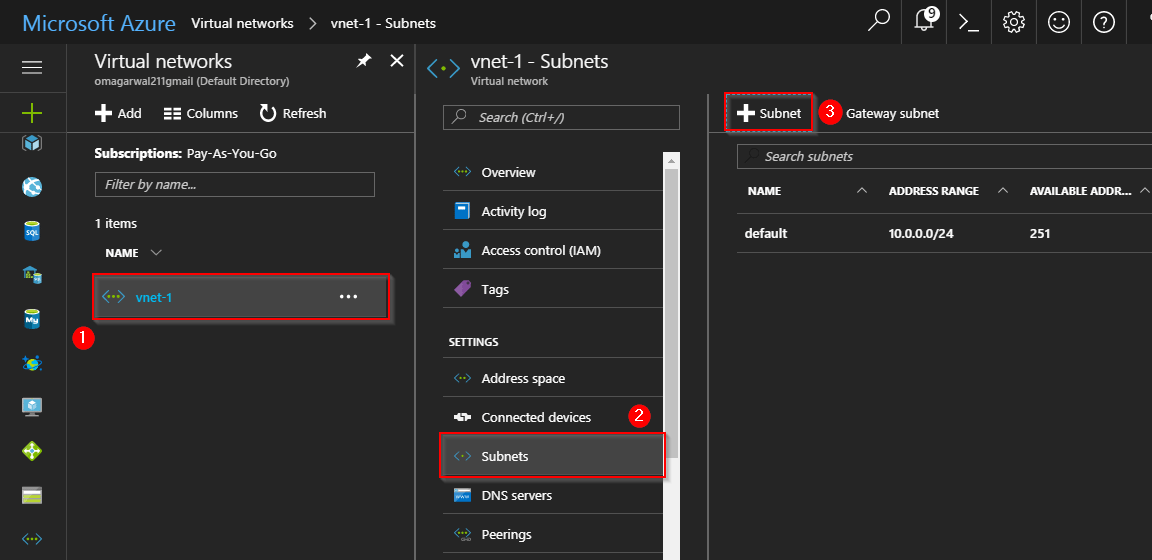
Step 5: On the next screen, create two subnets. Following the same steps, one for the database and one for a web server. Also, attach the respective network security groups.

Step 6: Alright, our network is set, all we have to do now is configure the Network Security Groups and create our servers inside this virtual network. Let’s create the webserver first.
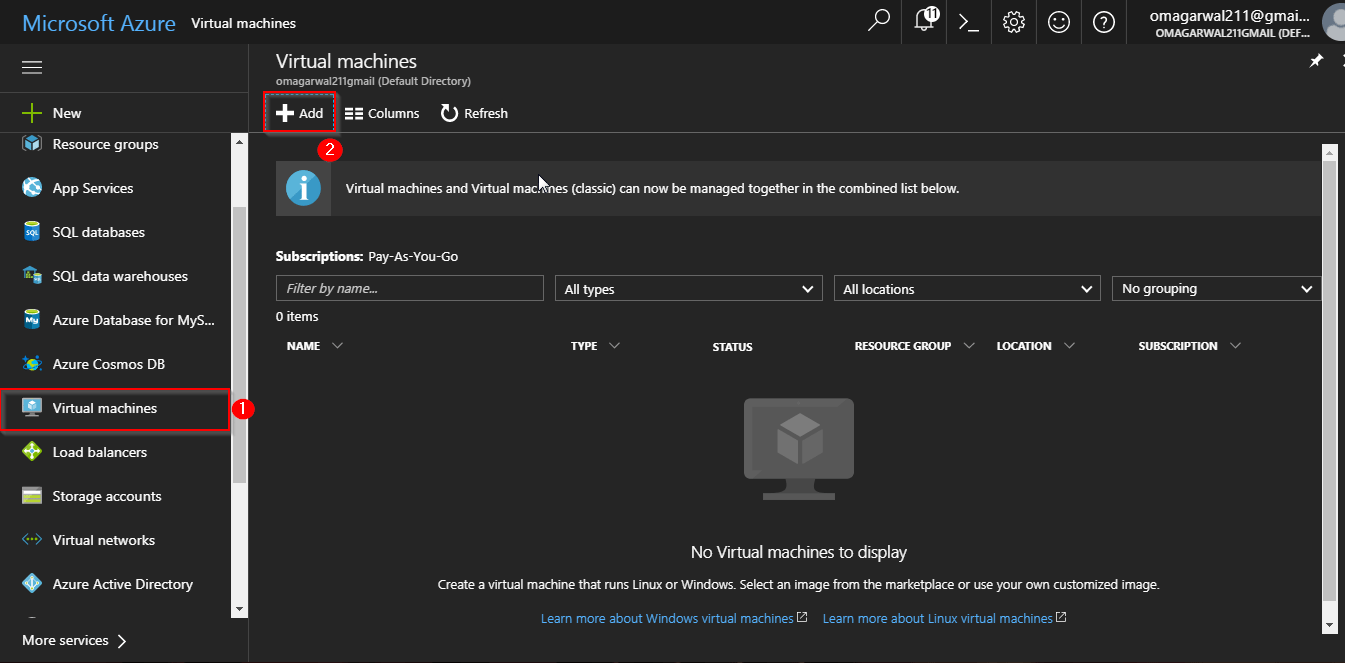
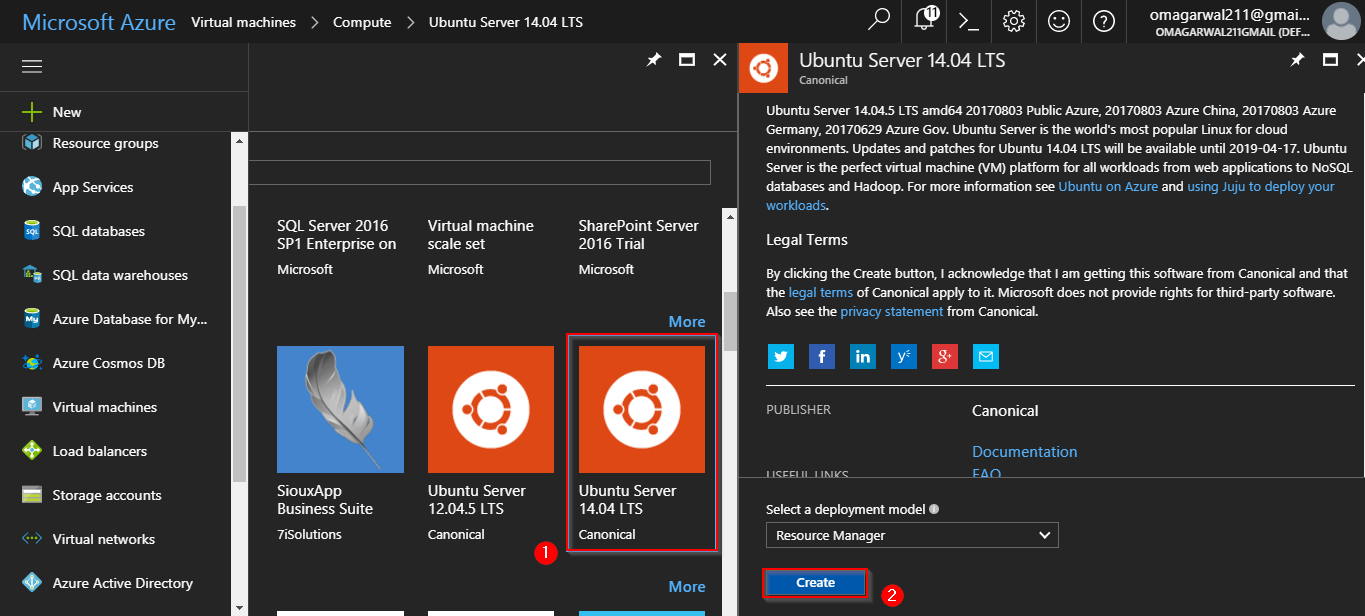
Step 7: On the next screen, select an OS of your choice. For our demo, we will select an Ubuntu OS. Finally, click on Create.
Step 8: Enter all the relevant information on the first page:

Next, select the relevant configuration. We are selecting the most basic configuration since this is a demonstration:

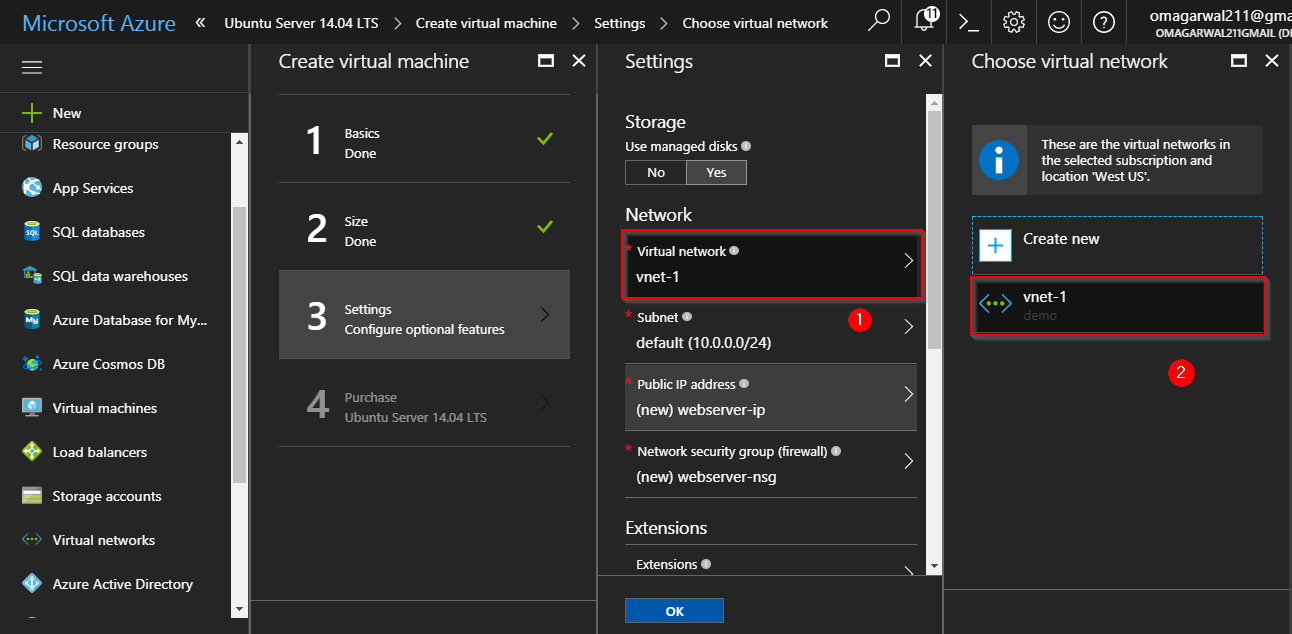
Step 9: On the next page, you will be selecting the virtual network, in which you want your virtual machine to be deployed.
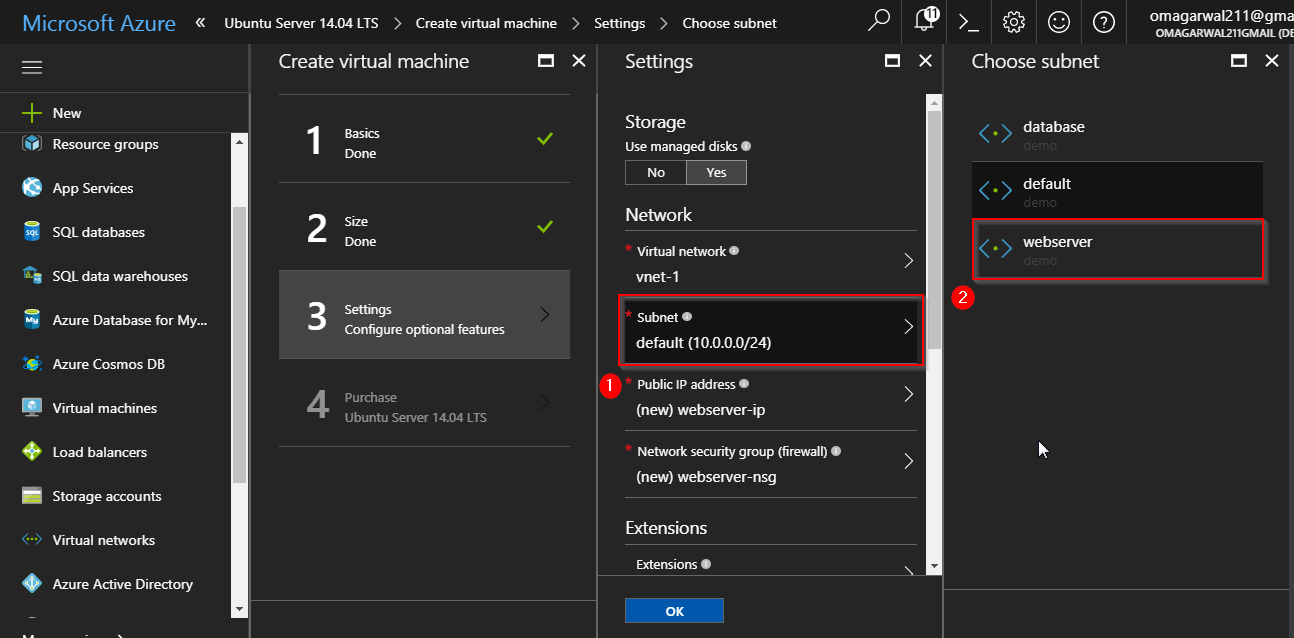
Next, select the subnet:
Open the network security group pane, and select the “None” option, since we have already attached the Network Security Group to our Virtual Network. Finally, click Ok, and your VM will start deploying. Do the same for your DB Server as well.

Step 10: You can go through the videos attached in the beginning of the blog to understand how to configure a webserver and a DB server, they will guide you how to do the same. Let me show you what my Network Security Group for webserver looks like as of now:

Since there is nothing added as of now in the inbound security rules, if I try to connect to my server using the IP address, I get the following error:

Step 11: To add any connection property follow the below image:

I have added the following connections:

For accessing your website you need to add HTTP and HTTPS. Finally, you would need SSH for configuring your server. I will get the following screen if I try to connect now for my webserver:

And this is the SSH window:

Designing Microsoft Azure Infrastructure [AZ 305] Course
Step 12: This is how my database Network Security Group looks like:


